myairbags.com
 888-779-9029
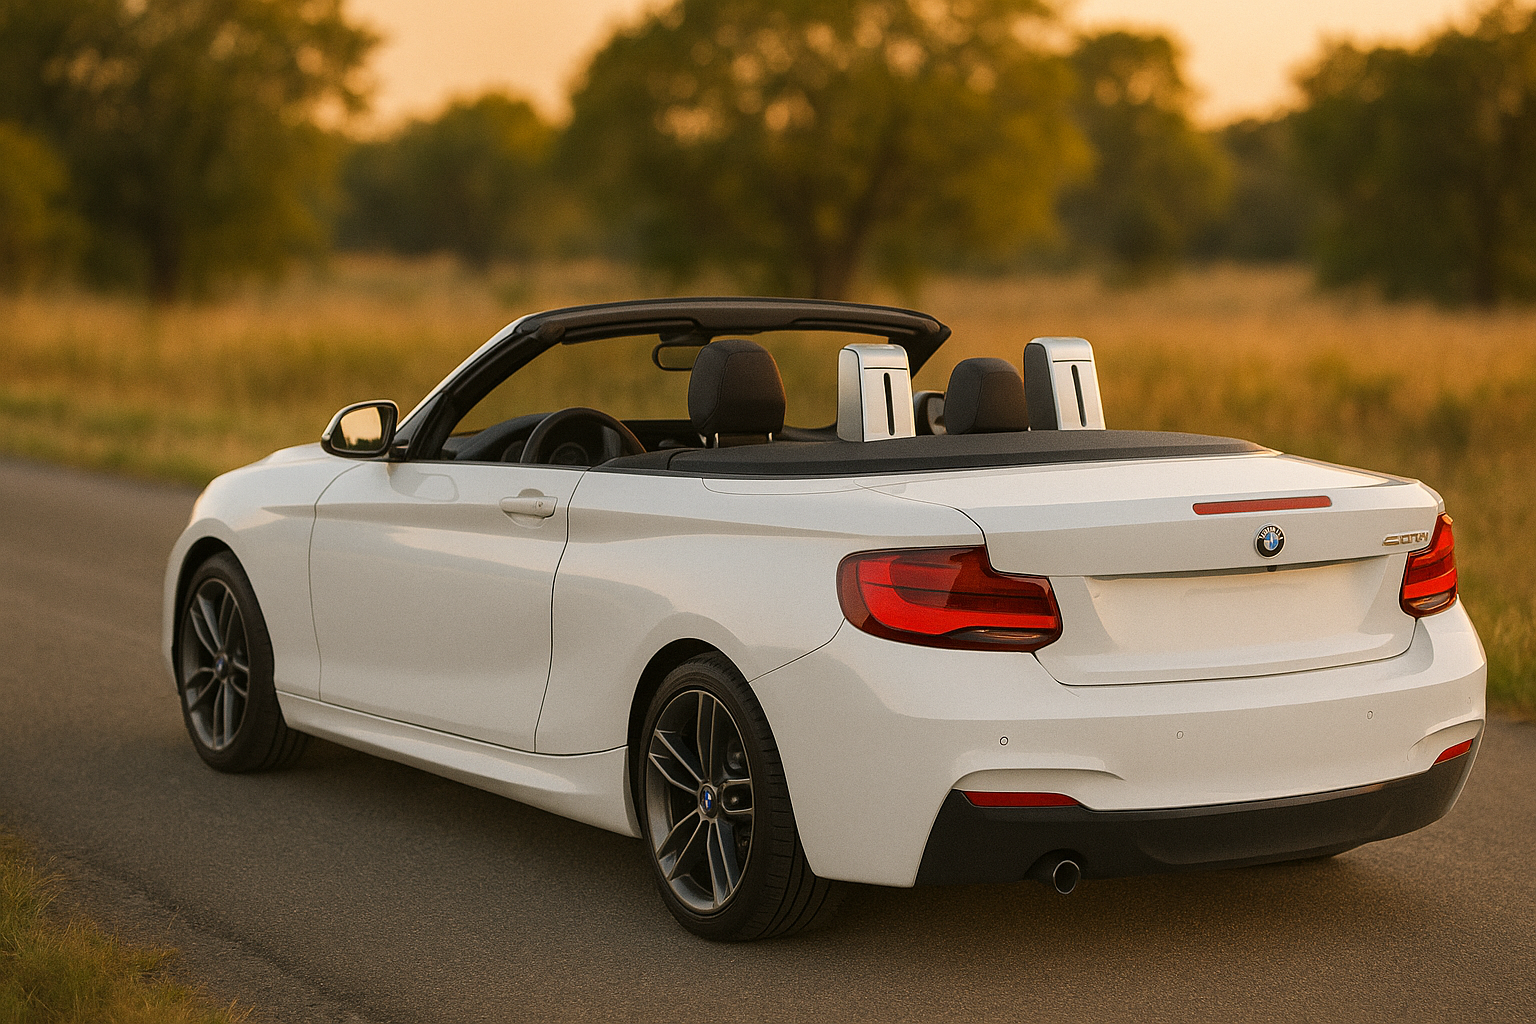
BMW 230i Rollover Bars
The rollover protection system (ROPS) on a BMW 230i convertible is one of those parts you never think about—until you have to. Whether you’re repairing post-accident damage, chasing down trim rattles, or sending the assemblies out for a professional reset, the pop-up bars sit right where you need to work. They’re engineered to deploy in a heartbeat and lock solid; that same strength is exactly why removal takes a little planning and a lot of respect for the sequence.
Before you touch a clip, set yourself up to win. Clear the trunk and rear seating area so you can move freely; lay down clean towels to protect painted and leather surfaces; and keep labeled bags ready for each set of screws, clips, and brackets you remove. BMW uses a mix of T20/T25/T30 Torx, E14/E17 external Torx, and 10–13 mm fasteners in this area—you’ll use all of them. Work slowly, especially around the rear glass and the upper deck where the covers are tight and the clips are easy to mar. And one golden rule: never power or move the top while the ROPS assemblies or their wiring are loose. If your bars have deployed or there’s a fault stored, plan on a repair-and-return service rather than forcing anything back into place; you’ll restore function, keep your original fitment, and avoid a dealer-level parts bill.
Read this first: safety & prep
Before you touch any part of the SRS/ROPS system, disconnect the battery and wait a few minutes so capacitors can discharge. The video walk-through for the BMW 230i shows disconnecting the battery, opening the top partway, and carefully freeing trim around the roll-over assemblies. In general, follow BMW’s safety notes: do not operate the convertible top if the bars are extended, and don’t modify or probe ROPS wiring with power connected.
Tools you’ll actually use (from the teardown): 6 mm Allen (manual top release), Torx T20/T25/T30, external Torx E14/E17, 10–13 mm sockets, trim/pry tools, pick for clips. (See the MyAirbags BMW 230i removal video for the exact order.)
Safety & prep: Battery disconnect timing
Know how long to wait before touching SRS wiring.
Open guide
Step-by-step removal
1) Battery & top positioning
Disconnect the battery. Use a 6 mm Allen to mechanically unlock the convertible system, then begin to open the top slightly. As you move it, support the glass so it doesn’t catch on the rollover bars—lift gently from underneath as shown in the video. Open the trunk support panel by pulling its two pins so the lower support can swing, giving you access.
2) Free the upper trim around each roll bar
Remove the T20 bolts at the top plastic cap and the Phillips-head clips (four total: two side, two center). Continue by popping the rear seat-back trim panel (it’s clipped—pull straight back from the top) and remove the T20 hidden behind it on each side.
3) Remove the rear metal protector & covers
Unbolt the metal protector (T20, two total), then remove the surrounding cover sets for easier access. Expect groups of T25 fasteners across the rear edges and under covers—BMW uses a lot of hidden clips; work slowly with a trim tool to avoid marking the panels.
4) Unclip the rear deck/backing
At the far rear corners, depress the two retaining pins and lift the deck cover. Remove the plastic backing (T25, five total: two sides, three middle). Watch the loose bracket as you finish the last bolts—it can fall once free. Unclip along the top edge and gently pull the backing down and away.
5) Open the rear seat and clear remaining clips
With the seat folded, remove the lower trim clips (four along the bottom, plus two on the rear panel per side). Pop the two small covers beneath each rear headrest and remove the T30 bolts underneath. Continue releasing the remaining top/bottom clips and remove two more T25 per side.
6) Free the seat-belt paths & blue retainers
Behind each rear belt, open the small access clip and feed the belt through its channel. From below at the rear, release the two blue clips per side—these retain the panel set around the roll bar bases. Press in at the rear door panel edge to pop a hidden clip; slide the large cover out.
7) Disconnect the rollover sensor harness
At the back side of each roll-over bar, release the electrical connector (lift the lock tab, pull straight out). Unclip any remaining wire retainers along the inner edges so the bar assembly can move freely.
8) Unbolt the roll-over assemblies
From the top: remove E17 bolts on both sides; from the lower mounts: remove E14 bolts per side holding the frame/cage. With the main hardware out, the “cage” is free—but don’t yank. There’s still the latch/cable interface to deal with.
9) Release the lock cable & final fasteners
Gently pull back the small cover over the lock to expose the 13 mm nuts; remove them. Pull the assembly toward the back seat, unhook the cable and release its retaining pin/clip. At this point, the complete roll-over bar assembly can be lifted out cleanly. Keep all hardware bagged and labeled for re-install.
Pro note: BMW cautions against operating the top if the bars are extended, and advises inspection after any unexpected activation. If your bars have deployed or set a fault, plan on professional service to restore proper function.
Post‑repair scan & initialization checklist
-
Reconnect the battery; key ON. Verify SRS light comes on briefly, then goes out.
-
Scan the vehicle (all modules), clear codes, and scan again to confirm none return.
-
Power the convertible top through its full range. Listen for rubs/creaks; stop if anything binds.
-
Verify seat‑belt operation and that guide trims don’t chafe the webbing.
-
Road‑test on a smooth loop; re‑scan for pending or re‑occurring SRS/ROPS faults.
ROPS reinstall: Reset a disengaged unit
If a unit loosens during handling, follow this quick reset.
Step-by-step
Rattle‑prevention & trim‑fit tips
-
Seat clips by pressing directly over each clip—avoid levering on exposed edges.
-
If a panel creaks on light pressure, remove and reseat the nearest clip rather than forcing it.
-
Where metal meets plastic (non‑SRS, non‑moving areas), a thin OEM‑style felt square can quiet minor buzzes. Do not add material near airbags or moving top linkages.
-
Recheck panel gaps after a short drive and temperature change; plastics can settle.
“ROPS fault after a dead battery”
Vehicle: 2018 230i Convertible
Concern: After a jump‑start and battery swap, the SRS/ROPS light stayed on. Bars were not deployed, but multiple faults were stored for the rollover module and sensor plausibility.
Approach: Followed the same safety setup (battery disconnected, top manually positioned). Verified grounds and connector locks, then removed the rollover assemblies per the steps. Shipped both ROPS units and the airbag control module to MyAirbags in one batch. Documented harness routing with photos; protected connectors during packing.
Result: Units returned with proper lock action; module reset addressed stored faults. After reinstall, a scan/clear and key‑on self‑check extinguished the warning. The top cycled smoothly, and no codes returned after a road test.
Takeaway: Battery events can create spurious or persistent SRS/ROPS faults even without deployment. When in doubt, combine module reset with ROPS service to restore function and maintain OE fit.
FAQs
Can I drive with the rollover bars deployed?
No. Treat deployed bars and an SRS warning light as a safety issue. Have the system inspected and serviced before regular driving.
Do the bars need full replacement, or can they be repaired?
In many cases the assemblies can be professionally restored rather than replaced. Repair‑and‑return preserves OE fit and often reduces cost.
Will operating the convertible top damage anything during removal?
Avoid powering the top while the ROPS assemblies or wiring are loose. Use the manual top release to position things safely.
Which tools should I have on hand?
6 mm Allen; Torx T20/T25/T30; external Torx E14/E17; 10–13 mm sockets; trim tools; and a pick for clips.
Can MyAirbags clear my airbag light?
If the light is caused by deployed/faulted components, restoring those components and resetting the module typically resolves it. Always scan for codes after re‑install.
The smart way to finish (and a final safety reminder)
Done right, this job is clean, repeatable, and kind to your interior. The big wins come from sequencing: battery fully disconnected; manual top positioning with glass supported; harnesses unlocked before fasteners; upper E17 and lower E14 bolts removed in order; then the latch cable released so the cage lifts out without a fight. Bag hardware as you go and label each step—future‑you will thank present‑you during reinstall.
Common mistakes to avoid
• Powering the top while ROPS wiring is loose (risk to mechanisms and glass).
• Prying from the visible edge instead of the hidden release side (scratch city).
• Forgetting the two blue retainers at the base—panels won’t slide out until they’re free.
• Letting the rear support bracket drop as the last fastener comes out.
• Rushing harness disconnects—lift lock tabs fully and pull straight to protect terminals.
Reinstallation & post‑repair checks
Reinstall is the reverse of removal—take your time setting every clip home to prevent squeaks. Torque structural fasteners to factory spec from BMW repair info, route seat‑belts through their channels, and resecure the blue retainers. Reconnect the battery, then scan for SRS/ROPS codes. After MyAirbags’ repair, faults tied to the assemblies should clear and a self‑check should pass. Finally, function‑test the convertible top through its full range to confirm clearances and quiet operation.
When safety systems are involved, the cautious path is the smart path. Respect the sequence, protect the trim, and let specialists handle the repair. You’ll preserve OE fitment, restore full protection, and keep the job stress‑free from removal to reinstall.
Post-repair scan checklist
What to verify with your scan tool so the light stays off.
Follow this checklist